Resizing /boot on Raspberry Pi
The recommended size for the small /boot partition on the Raspberry Pi is now 256MB, which is grand because all of my Raspberry Pis have 40-45MB. Why? Because this was the recommended size for the small /boot partition. Anyway, things change and we have to move forward. It's now an issue because there are many large things that need to go into /boot (different kernel versions, different firmware, etc) and 45MB is just not enough to allow for future updates.
This morning I changed one of my Raspberry Pis by installing a new SD card fresh from an image and then I copied the data across. As it happened its existing SD card was having problems and so this was the right thing to do long term. However, you don't need to change your SD card in order to resize the /boot partition. I found this excellent guide on adafruit.com by Phillip Burgess and here is a rough summary of what to do.
Before you do it: 1. Read the excellent guide, 2. take copious backups, 3. this requires you to know a bit about Linux and using it - if you don't seek help, 4. this is provided with no warranty - if it breaks, all I can offer you is the tragedy of keeping the pieces.
I had two Pis to fix and I used my broken SD card to test the process - so I've run through this three times. Firstly you need a second Raspberry Pi (or a Linux machine capable of reading the SD card from the machine you are resizing). You will need a means of reading a second SD card in this machine. Then the procedure is this (assuming complete familiarity with the command line):
- It's best if your target machine is as tidy as possible. If there are unnecessary files, remove them. For example, I found 4 months of video capture on my garage monitoring Pi. I removed the files because they will need to be shifted about during the process and that takes time.
- Shutdown the machine you are resizing cleanly.
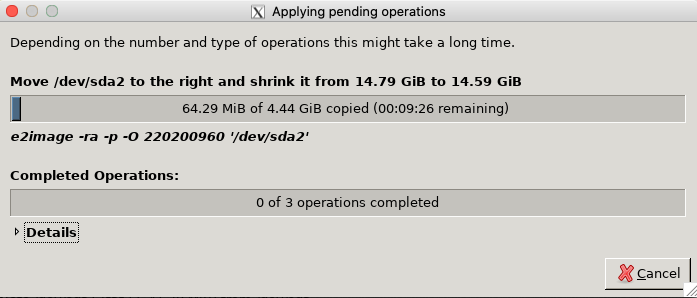
- Take its SD card, insert it into a reader and plug that into your second machine.
- As root, mount the first partition which is boot and copy all the files off it. Do not miss this step!
mount /dev/sda1 /mnt
mkdir /somewhere/boot1
cp -pR /mnt/* /somewhere/boot1
umount /mnt
- On the second machine, install GParted. The whole set of operations can be done with command-line tools if you want but GParted manages it all for you:
apt-get -y install gparted
- Run GParted (e.g. from the command line). It's got a graphical interface so you need to be using an X server or similar. You will need to be on the system directly using the GUI or in my case, I'm using a Mac with X11/XQuartz logged into my second raspberry Pi via an X terminal as root and using it to display GParted.
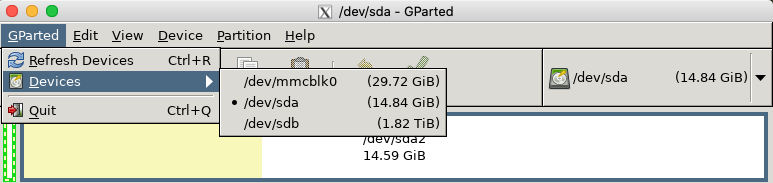
- Select the correct SD card - this will usually appear as /dev/sda or similar - for the rest of this I will assume sda. It may well be different for your system.
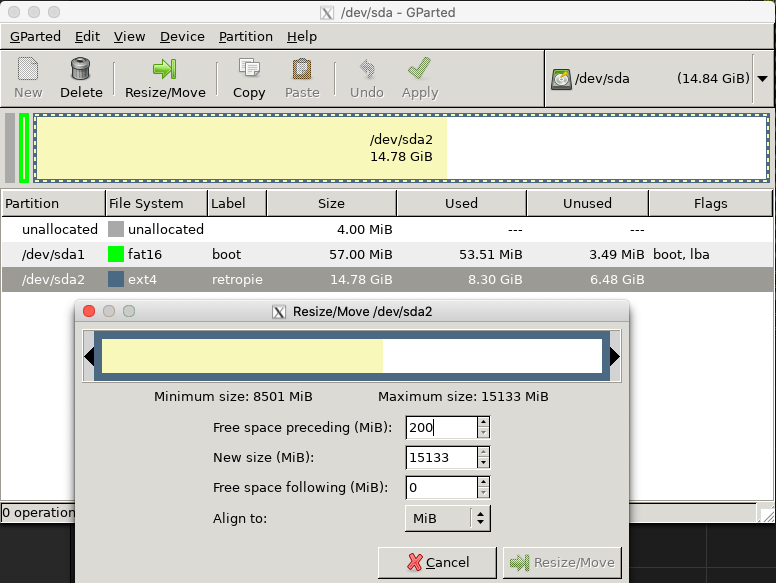
- Resize/Move /dev/sda2 - this is the Linux filesystem with all your data on it. In the case of the picture, my /boot is 57MB and I want it to be roughly 250MB so I will request 200MB of free space at the beginning of /dev/sda2
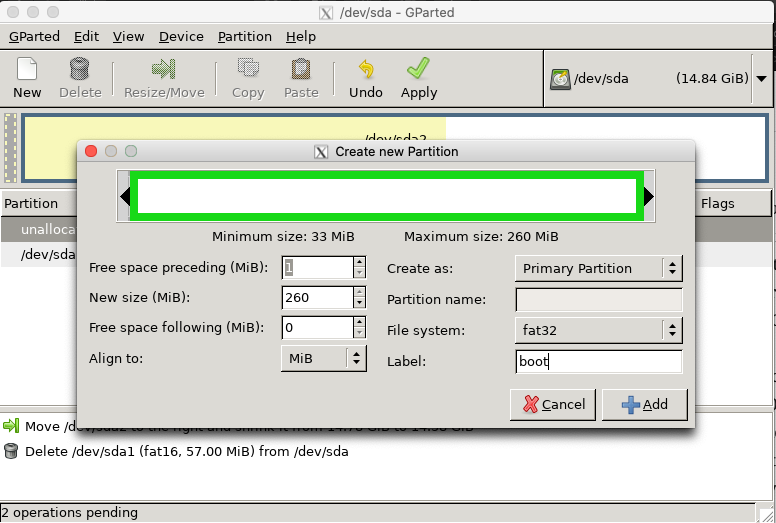
- Delete the boot partition. This needs to be done because a fat32 filesystem cannot easily be re-sized (at least not with GParted). Choose it and delete it using the button above.
- Add a new partition, size 250MB (or whatever you have free), using fat32 and labelling it boot. This makes a new boot partition. And now you understand why you had to preserve the files.
- Scarily, commit your changes with the Apply button.
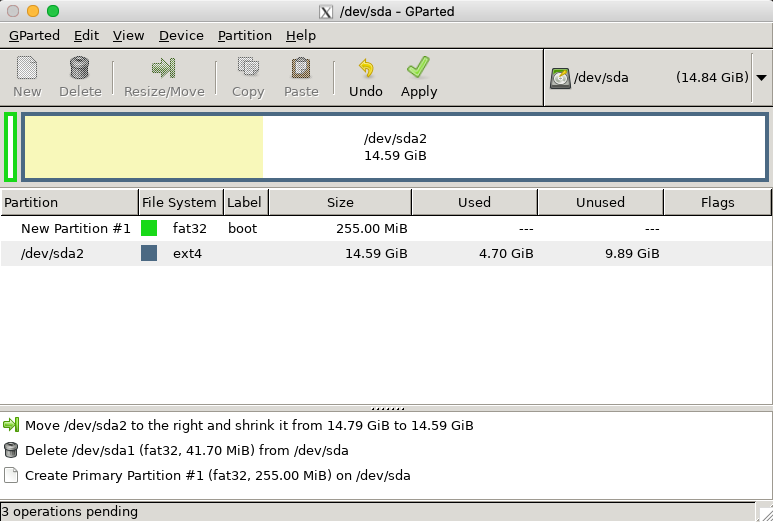
- Sit back, relax and get coffee whilst the partitions resize (provided that the power doesn't go off of course - you did take backups, right?)
- As root, remount the new boot partition and copy the files back:
mount /dev/sda1 /mnt
cp -pR /somewhere/boot1/* /mnt
umount /mnt
- Now you have an SD card with a larger /boot and it should be ready to go back into the original Pi. Make sure it is unmounted, remove it and put it back into the original Raspberry Pi.