Running Tezos on Windows
I suspect you never thought that I would write such an article. I’ve been using Macs since November 2007. Before that I used NetBSD and some Linux. There was always a Windows machine lurking around in case. But once I went to the Mac, I got the best of two worlds: Unix underneath and good applications on top.
I used to tolerate Windows in the workplace, then in 2018 I got a job where I could use a Mac. Since then, I haven’t used Windows much at all. I’m not the only one it seems. There was one time that I had to decrypt some X-rays and the software needed Windows. I could not even borrow a machine because in the road where I live, everyone uses Macs. I had to fire up a VM in the end.
Fast forward to today. I’m doing two projects where I need a Windows machine, so I’ve bought an El-Cheapo(TM) Dell laptop. And it’s awful. Dreadful. Nil points. I must stand in disinfectant to use it. If I don’t turn it on for a couple of days, I must wait patiently for many updates to apply. It can’t seem to cope with more than one application.
In my humble opinion, the Windows experience has not got any better since 2018. If anything it is worse. Whilst writing this article, I tried to reset the machine back to its original installation. The first two attempts failed. I had to delete all my data on the machine to get it to work on the third attempt. And then at least one package was corrupted.
But, the point is, quite a lot of the folks on the Internet use Windows. Some people prefer it. And the good news is they can run my favourite blockchain’s software on it. The trick is that Windows includes a subsystem for Linux compatibility.
Hang on - I can hear the fan on my Windows laptop. Let me get a fire extinguisher. Give me some minutes please. Right that’s better, I’ve shutdown all the apps…
Some bright spark at Microsoft decided to add Linux virtualisation. I can see why they did it. It means developers can use Windows machines to build applications on Linux.
Octez is the reference implementation of Tezos. We are going to show you how to set up a Tezos node on Windows by installing Octez. The node will run as a service on the machine. We will use the node on a Tezos test network called tallinnnet. This is one of the protocol test networks.
If you need to set up a Tezos baker, you can do this too. Please see my quick start guide. In fact, you can run the entire suite of Octez software.
I will assume the latest Windows 11. The first step is to make sure that your machine has the Windows Subsystem for Linux v2 (WSL) installed.
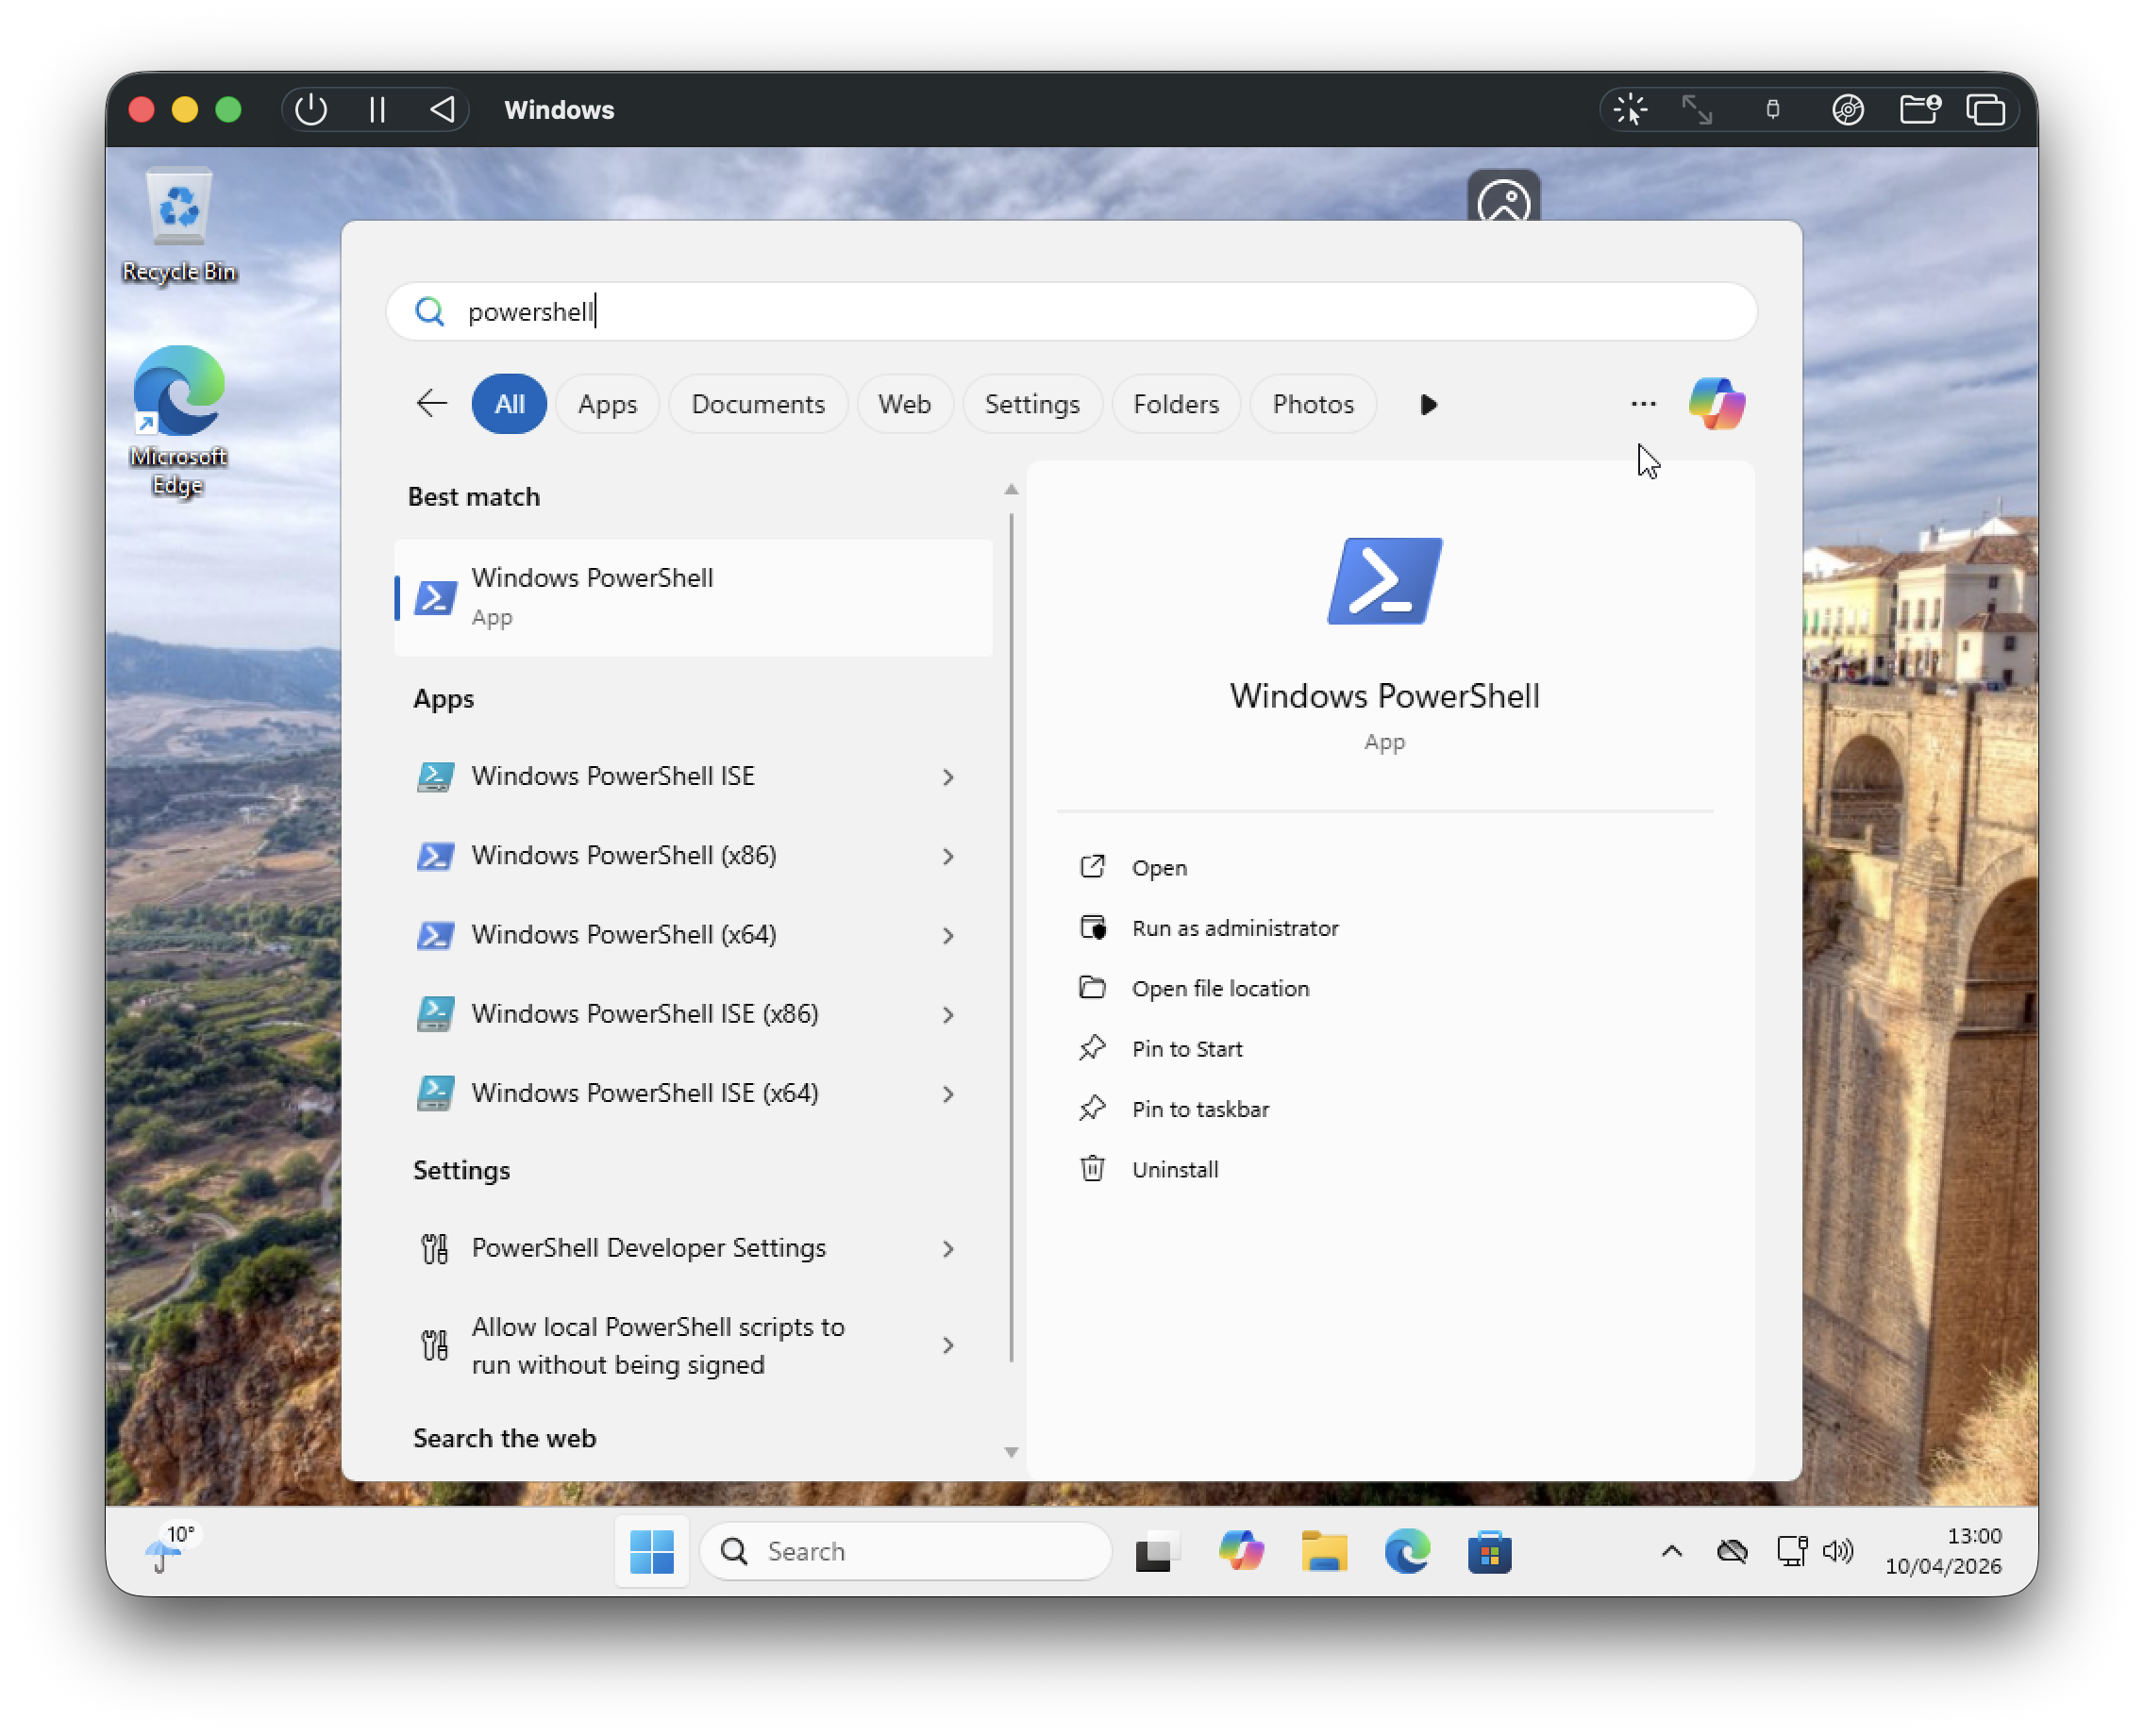
Click your friendly Start/Windows icon and run PowerShell. You can do this by searching for it too. Once you’ve run it, you’ll want to pin it to your taskbar. Right click the icon and choose “Pin to Taskbar”.
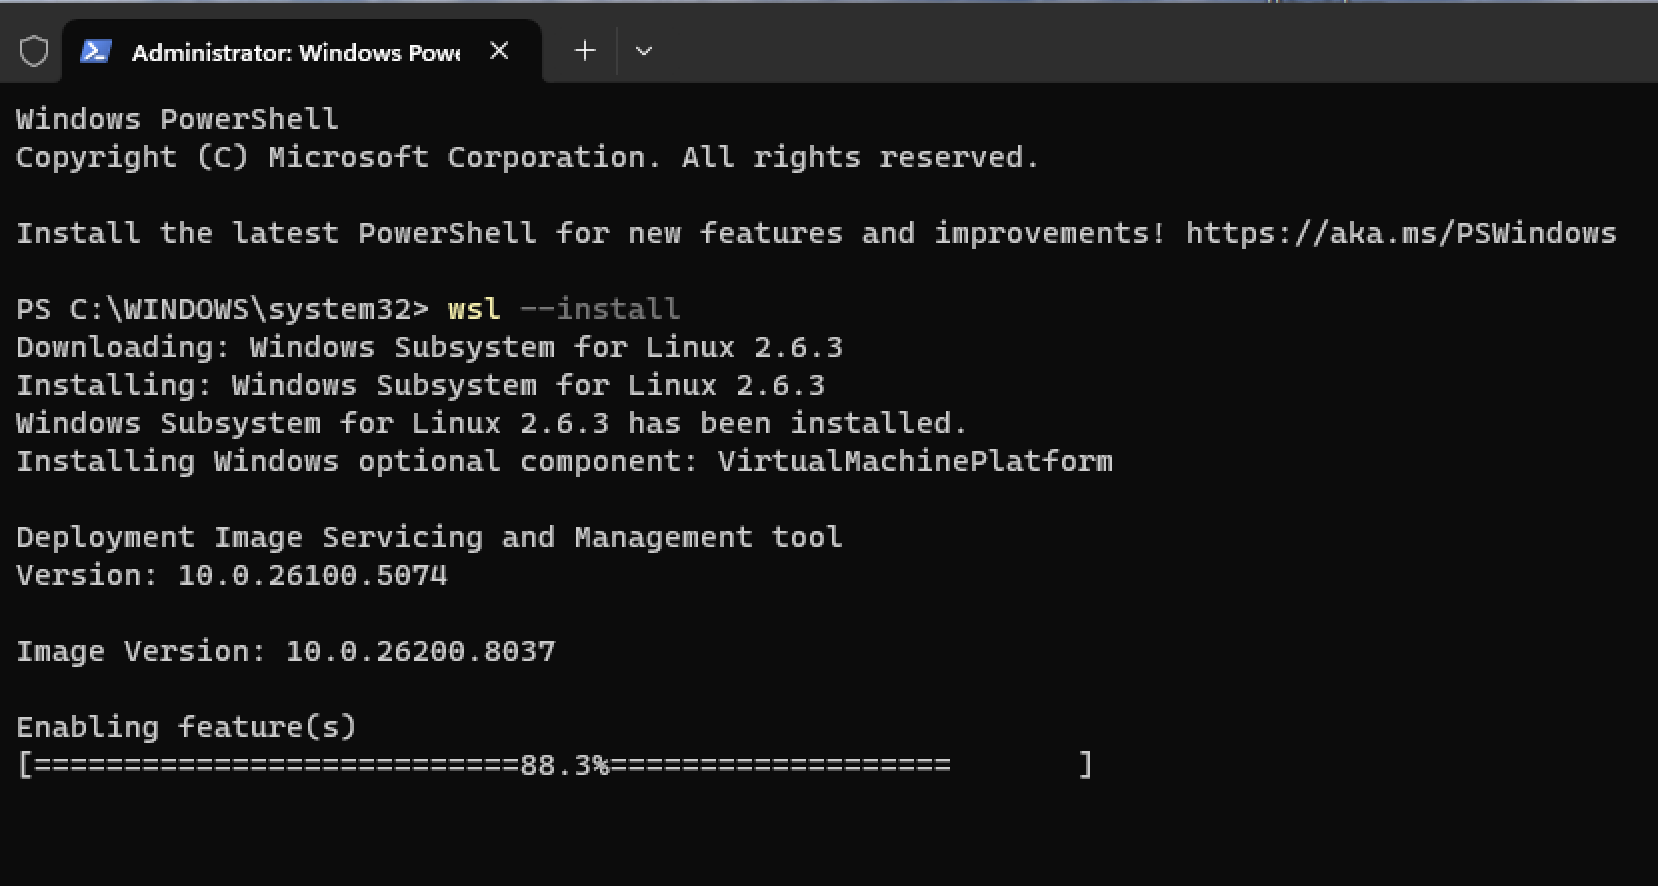
In PowerShell, type the following to install WSL for the first time.
PS C:\> wsl --install
Windows will ask you for your permission to install the software. Choose Yes. Once the procedure has finished, you’ll need to reboot your machine.
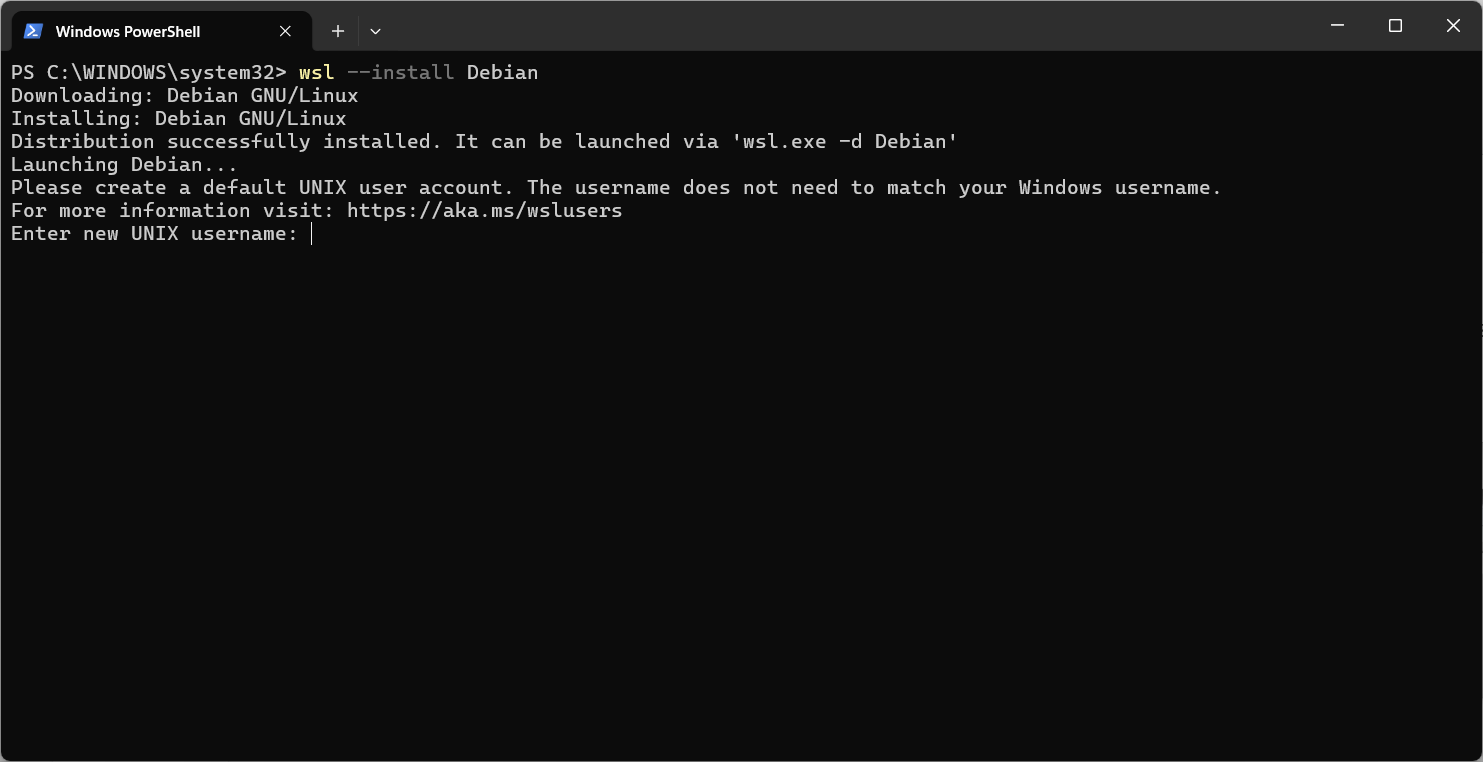
Once the machine has rebooted, enter PowerShell again. We will use Debian Linux. You can use Ubuntu as well, but I’ve tested everything with Debian.
PS C:\> wsl --install Debian
This will download the Debian Linux operating system and install it under WSL. When this has finished, you’ll be asked to give a username for an account. Here I’m using admin. At the same time, set a password.
This user has sudo privileges and is able to administrate the Debian Operating System. You can enter the operating environment at any time from PowerShell. I use this command to get into the correct home directory (~ is the home directory on Linux).
PS C:\> wsl --cd ~
Before continuing, it is worth mentioning three things.
1. Multiple Linux operating systems
If you already have an operating system installed under WSL, you’ll need to specify Debian each time you enter WSL. For example:
PS C:\> wsl --distribution Debian --cd ~
Or you can make it the default operating system with:
PS C:\> wsl --set-default Debian
2. Not enough RAM on WSL
Windows allocates WSL half of the system RAM. If you have a machine with 16GB of RAM, WSL will be able to use 8GB. You can get away with 8GB for running Octez, but you will not be able to build from source if you want to. To build Octez from source, you will need at least 16GB of RAM in the machine and you will need to allocate 16GB to WSL. If you want to run a node, DAL node and baker together, I’d recommend doing the same. You can change the memory allocated as follows in PowerShell:
PS C:\> notepad $HOME/.wslconfig
If the file is blank, use these entries:
[wsl2]
memory=16GB
If the file has values already, change the memory line to suit your needs. Also you can add a line specifying the amount of swap space you would like with swap=. For example:
[wsl2]
memory=16GB
swap=16GB
Then shutdown WSL and start it again. The memory allocated will have changed:
PS C:\> wsl --shutdown
PS C:\> wsl
$ free
           total    used      free   shared   buff/cache  available
Mem:    16057562 1351156  14559236    55476       437484   14706396
Swap:   16057562       0  16057562
3. Problems with virtualisation
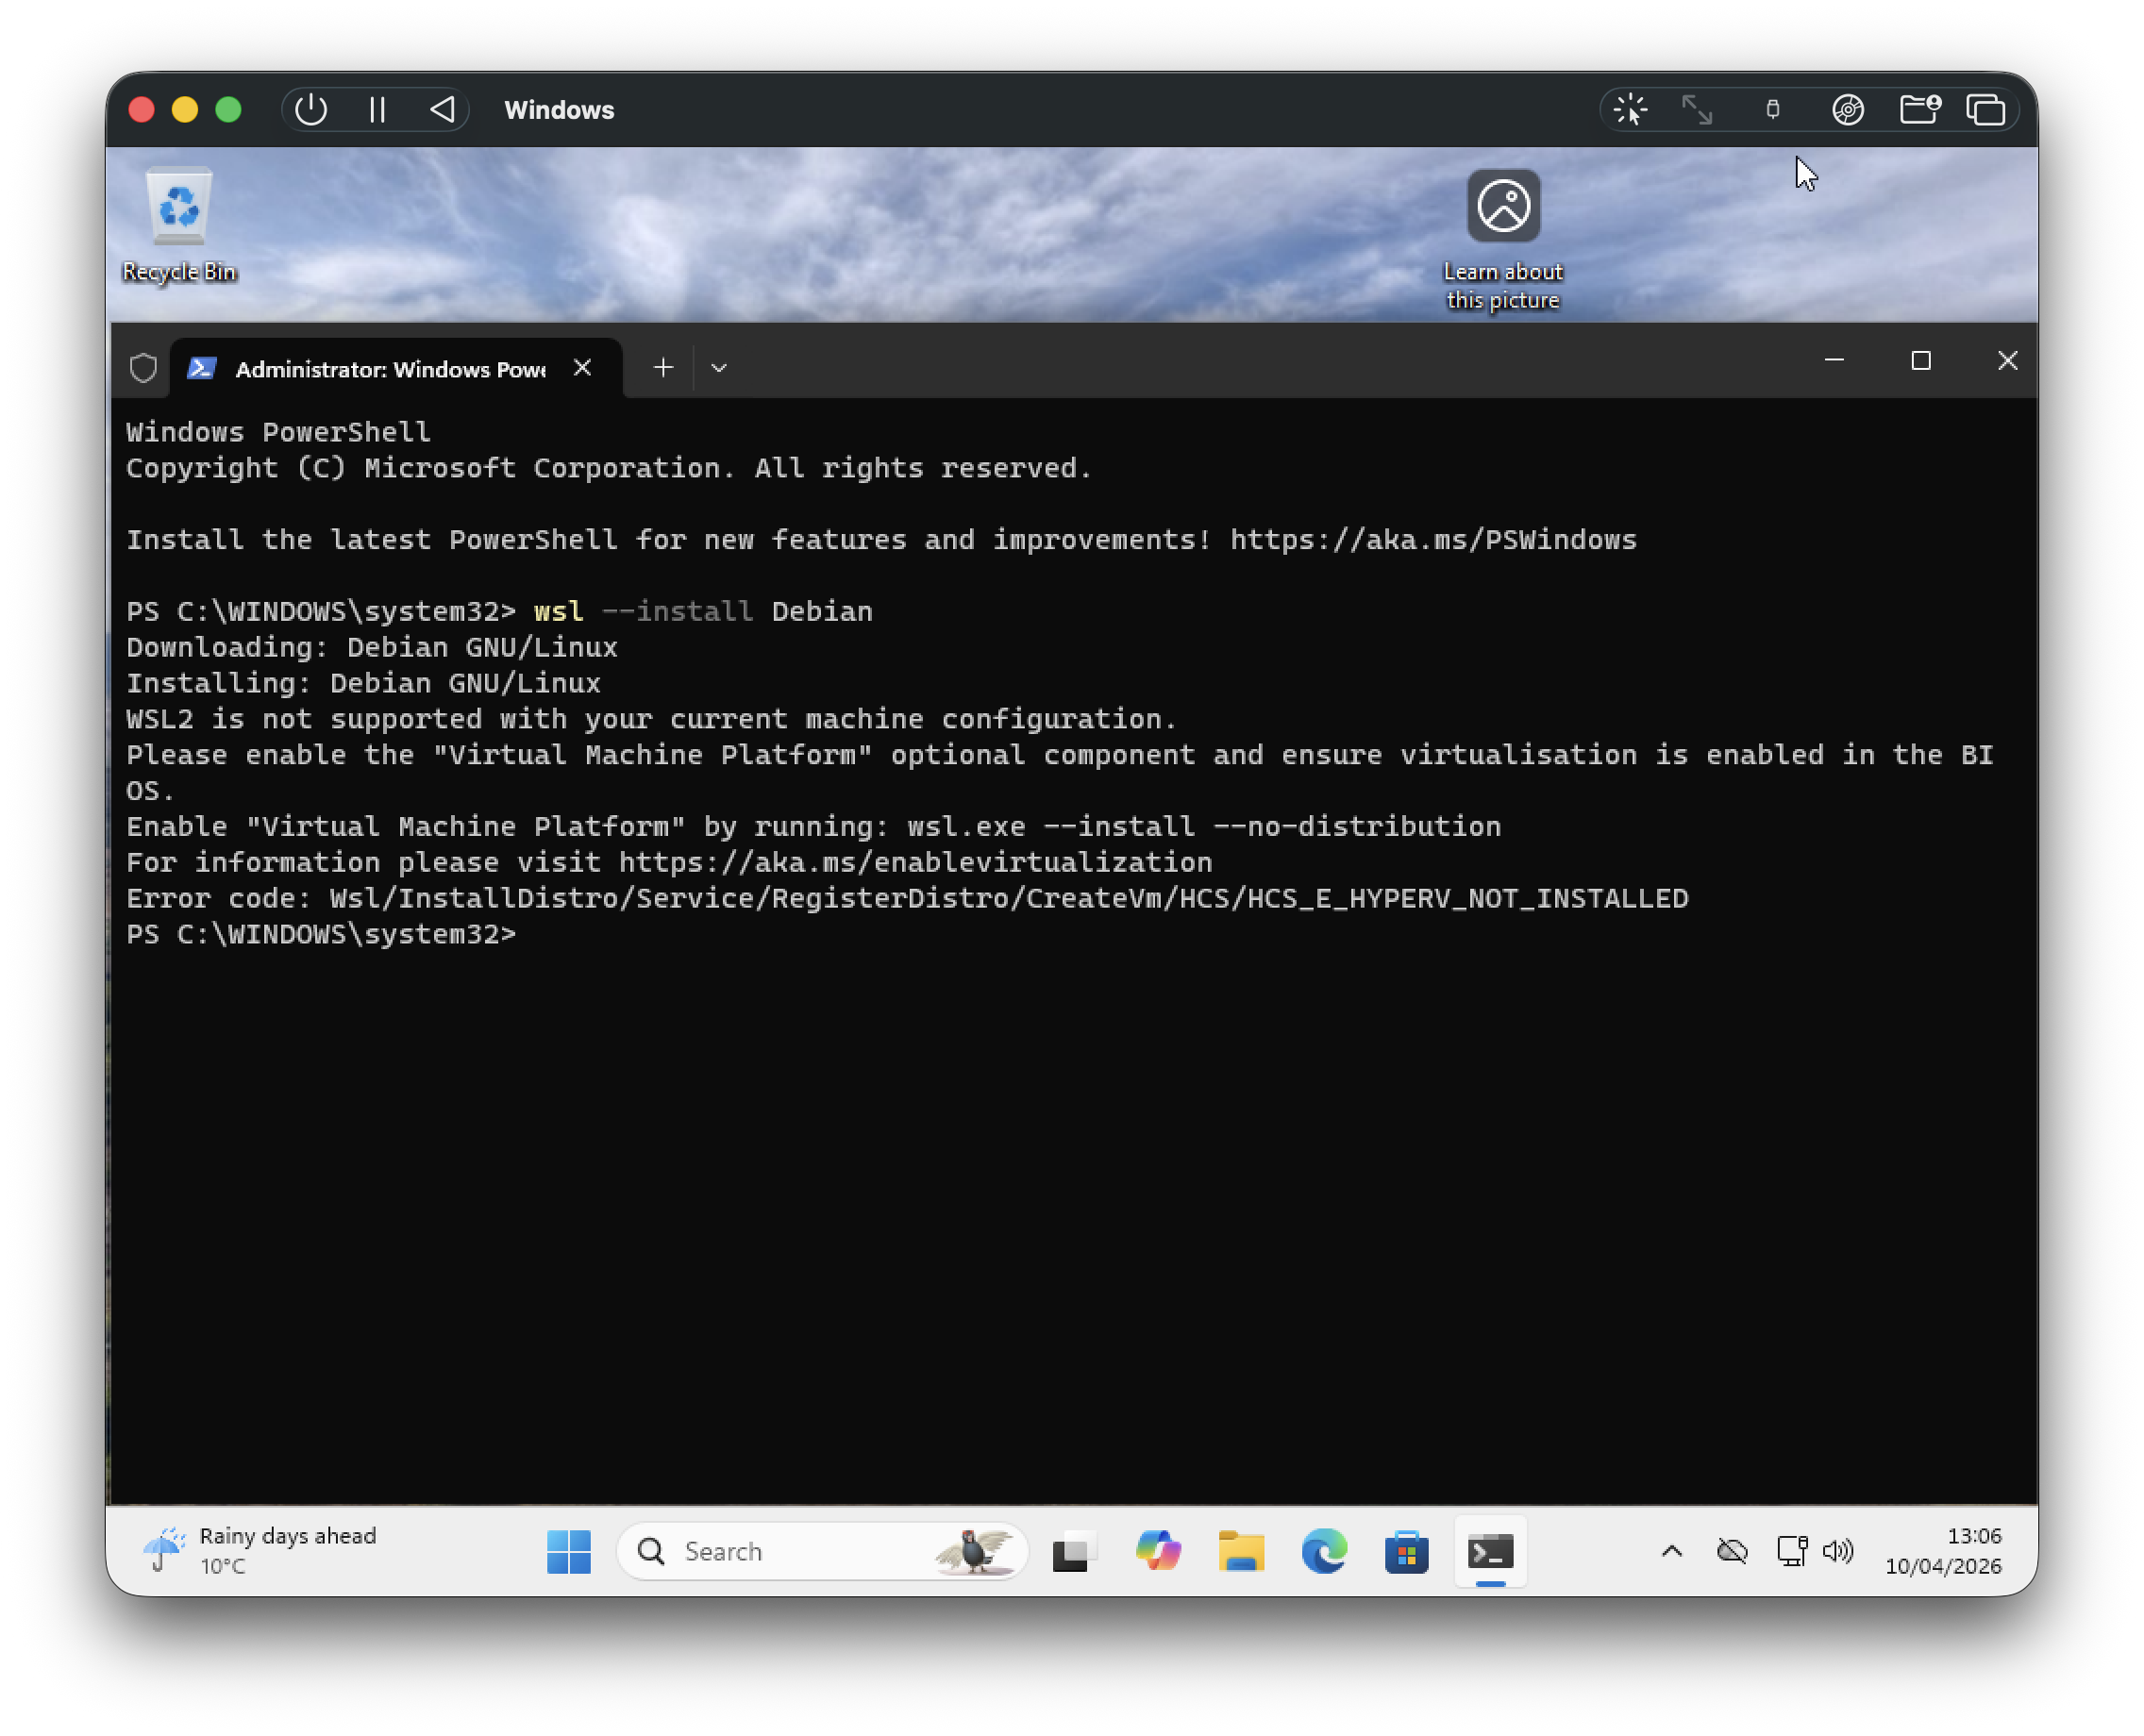
You can resolve this by turning on virtualisation in your computer’s BIOS. See the link https://aka.ms/enablevirtualisation for more details. There are some circumstances where this is not possible - for example, if you are using a VM to run Windows.
Now that we have a working installation of Debian under WSL, we can follow my Quick Start guide to setup Octez. We will install the node from the official Octez package repository onto a test network. If you want to install a baker as well, you can follow the guide. We will not cover the detail - we just want to show you how to get started quickly.
Enter the WSL environment using wsl --cd ~ in PowerShell. We will denote the prompt to the shell in Linux (which is usually bash) by $. It’s prudent to check that the Linux environment is up to date:
PS C:\> wsl --cd ~
$ sudo apt update
$ sudo apt upgrade -y
Then make sure that curl, wget and gpg are installed:
$ sudo apt install -y curl wget gpg
Then accept the GPG key from the Octez packages repository:
$ curl -s "https://packages.nomadic-labs.com/debian/octez.asc" | \
    sudo gpg --dearmor -o /etc/apt/keyrings/octez.gpg
Add the package source list for Octez. For example:
echo "deb [signed-by=/etc/apt/keyrings/octez.gpg] https://packages.nomadic-labs.com/debian trixie main" \
 | sudo tee /etc/apt/sources.list.d/octez.list
Update the packages catalogue.
$ sudo apt update
Install the Octez node:
$ sudo apt install -y octez-node
We are going to run the node on the tallinnnet test network. This test network is smaller than mainnet and is specifically for testing. More importantly, the coins do not have any real value and so you can safely make mistakes.
The software in the Octez packages run under a user account called tezos. We need to use this account to configure the node. Firstly, switch to this user:
$ sudo su - tezos
Now we configure the node.
$ octez-node config init --network=https://teztnets.com/tallinnnet \
                        --history-mode=rolling \
                        --net-addr="[::]:9732" \
                        --rpc-addr="127.0.0.1:8732"
Created /home/tezos/.tezos-node/config.json for network.
The command line options are:
- network - tells the node we want to run on the tallinnnet test network. The URL points to a web resource containing information about it.
- history-mode - specifies the rolling history mode.
- net-addr - tells the node to listen on TCP port 9732 to the Tezos gossip network.
- rpc-addr - tells the node which address and port to listen on for Remote Procedure Calls (RPC). We will only listen locally on the machine.
In rolling history mode the node keeps enough information to take part in the chain.
The node’s storage and configuration are in the directory .tezos-node in the tezos user’s home directory. Included in the config.json file is information about the network’s boot nodes. They have enough information to help your node join the network.
A snapshot is a recent backup of the Tezos blockchain. We will download a snapshot from Tezos Foundation’s snapshot server. Then we will import it.
As the tezos user:
$ wget https://snapshots.tzinit.org/tallinnnet/rolling
2026-04-26 15:42:08 (4.79 MB/s) - ‘rolling’ saved [170203648/170203648]

$ octez-node snapshot import rolling
Apr 26 15:42:34.901: Note: the import of a snapshot can be sped up using the
Apr 26 15:42:34.901:   '--no-check' option. Only use this option if you fully
Apr 26 15:42:34.901:   trust the snapshot source.
Apr 26 15:42:34.901: importing data from snapshot rolling:
Apr 26 15:42:34.901:   chain TEZOS_TALLINNNET_2025-11-18T21:00:00Z, block hash BMYy7T4rdRcPHzU65CA76gdzGFRmiNYcjEPSeQrQfjhAXFoBFnU at level 3371977, timestamp 2026-04-26T11:59:55-00:00 in rolling (snapshot version 9)
...
Running the integrity_check.
172k contents / 249k nodes / 1 commits
Ok
Checking context integrity Done
Storing floating blocks: 151 blocks written Done
Apr 26 15:42:39.788: successful import from file rolling
Exit the tezos user session with:
$ exit
Now we run the node and synchronise it with the network. The packages provide a convenient set of startup scripts. Enable and start the node service with:
$ sudo systemctl enable octez-node
$ sudo systemctl start octez-node
You can check progress in the logs:
$ sudo tail -f /var/log/tezos/node.log
Apr 26 15:45:57.130 NOTICE │ the node configuration has been successfully validated.
Apr 26 15:45:57.131 NOTICE │ read identity file
Apr 26 15:45:57.131 NOTICE │ starting the Octez node 24.4 (43dd36f3)
Apr 26 15:45:57.274 NOTICE │ disabled local peer discovery
Apr 26 15:45:57.282 NOTICE │ p2p initialization: bootstrapping
Apr 26 15:45:57.307 NOTICE │ p2p initialization: p2p_maintenance_started
Apr 26 15:45:57.945 NOTICE │ external validator initialized
Apr 26 15:45:57.946 NOTICE │ initializing brassaia context at /var/tezos/.tezos-node/context
Apr 26 15:45:59.027 NOTICE │ activate chain NetXnHfVqm9iesp
...
Apr 26 15:45:59.028 NOTICE │ the Tezos node is now running
Apr 26 15:45:59.120 NOTICE │ fetching branch of 322 blocks from peer idsW2EA5a8yhre5tXnBTz8QLh6mnek
Apr 26 15:45:59.173 NOTICE │ fetching branch of 339 blocks from peer idtHQCUCwbWTLq7iZEhFX3pAdjji1B
Apr 26 15:45:59.222 NOTICE │ fetching branch of 305 blocks from peer idsctwU5PrDM3dpQ2LuDem1pDDjXRP
Apr 26 15:45:59.225 NOTICE │ fetching branch of 311 blocks from peer idt6HX7XYG9r2Y5NYjKaAaeshX9UWm
Apr 26 15:45:59.791 NOTICE │ fetching branch of 290 blocks from peer idtja5BqJrERPQ8qEzdi7hRS4y4xGy
Apr 26 15:45:59.850 NOTICE │ synchronizing: current head is 17min53s old (level: 3374200)
Apr 26 15:45:59.881 NOTICE │ fetching branch of 285 blocks from peer idszv4sU7qGEPvgb7UWa4G89WavHQf
...
Apr 26 15:46:12.020 NOTICE │ fetching branch of 4 blocks from peer idt6HX7XYG9r2Y5NYjKaAaeshX9UWm
Apr 26 15:46:12.118 NOTICE │ synchronisation status: synced
Apr 26 15:46:12.122 NOTICE │ chain is bootstrapped
Use CTRL+C to break out of the log file tail.
The node generates an identity key to join the network with. Then the node will synchronise with the network. It downloads the blocks from when the snapshot was taken to the current time. Once the node’s identity has been generated, you can connect to the node and see the progress:
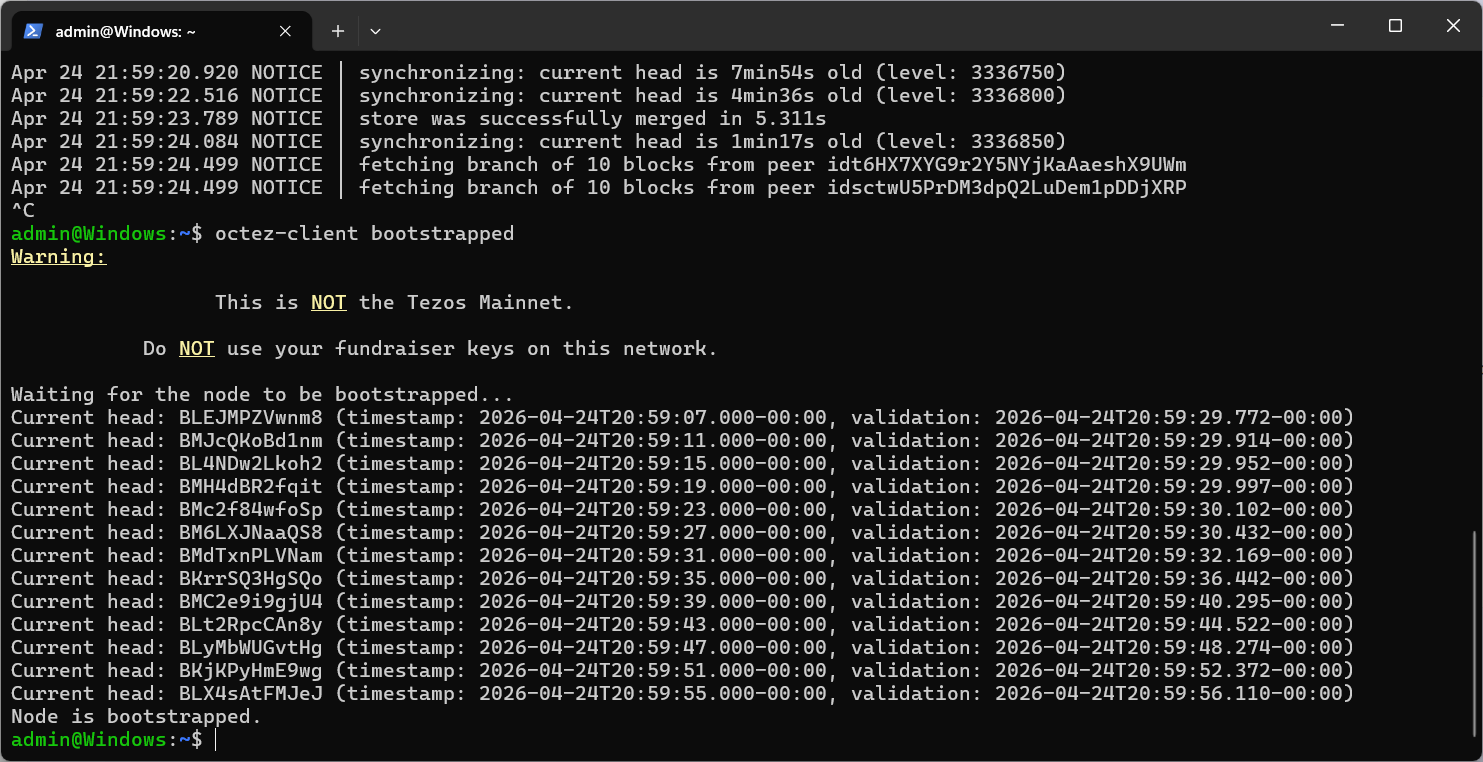
$ octez-client bootstrapped
Warning:

                 This is NOT the Tezos Mainnet.

           Do NOT use your fundraiser keys on this network.

Waiting for the node to be bootstrapped...
...
Current head: BM2JfqL2DJnD (timestamp: 2026-04-26T15:46:05.000-00:00, validation: 2026-04-26T15:46:05.500-00:00)
Current head: BLqtHTHcfoYW (timestamp: 2026-04-26T15:46:11.000-00:00, validation: 2026-04-26T15:46:12.118-00:00)
Node is bootstrapped.
Use CTRL+C to exit if necessary.
To conclude, we have successfully put a Tezos node on the tallinnnet test network using Windows. All the Octez components run on WSL as they would on a Linux machine. Thus, if you are a Windows user you can take part on the Tezos blockchain just like anyone else!