How to set up an Etherlink Rollup Node (2026)
This is an update of my article from March 1st, 2024.
Some time ago, Thomas and I wrote a how-to on getting started with smart rollups. We showed how to set up a rollup using the test “echo kernel” and then ran the smart rollup operator to process it.
In this post, we (in this case, the royal we) will show you how to run a smart rollup node on the Etherlink rollup. We will show you how to do it on shadownet, but of course you can do it on mainnet too.
This is a really a quick-start guide to help you to use the Octez packages. We won’t go into the details too much, but we’ll cover the basics.
Etherlink - in brief
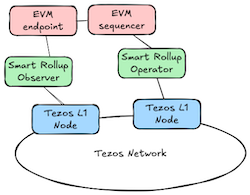
Etherlink is an Ethereum Virtual Machine (EVM) compatible rollup on the Tezos network. It will, later this year, morph into Tezos X and be able to run both Michelson and EVM contracts. We will assume that you know enough about Etherlink to want to run a smart rollup node.
It’s possible just to observe the rollup and simply store the data on the local disc. Or you can run a full operator and push the rollup state onto the main blockchain. To run as a full operator, you will need a 10000tz security bond and some funds to cover the transaction costs.
Additionally there are server programs to provide the EVM compatibility layer and run a full sequencer. These sit above the smart rollup. We will not cover them in this article.
On the shadownet test network, the Etherlink test rollup was deployed on 28th August 2025, replacing a previous test rollup. The production version of Etherlink has run on mainnet since Q2 2024.
| Network | Smart rollup address |
|---|---|
| shadownet | sr19fMYrr5C4qqvQqQrDSjtP31GcrWjodzvg |
| mainnet | sr1Ghq66tYK9y3r8CC1Tf8i8m5nxh8nTvZEf |
For more information, please refer to the Etherlink website, follow @etherlink on X or join the Etherlink Discord.
Assumptions
To make life easy, I’m going to assume that we will run all services on the same machine. If you decide to use different machines, you will need to adjust the configuration. We will run a layer 1 node and the smart rollup node.
I’m going to use 500GB of disc and 32GB RAM. You might be able to get away with less. On mainnet, you will need more. I use cloud services for my infrastructure and the default disc is usually fast enough. If you are using hardware, I would recommend a fast SSD drive for performance.
We will install Octez (the Tezos reference implementation) using the Tzinit packages. We will assume that the target operating system is Debian Linux 13. You can find packages for other versions too. Also you can build the Octez software from scratch. And of course you can use it on a Mac.
We will join the test Etherlink rollup on shadownet. The instructions are very similar for mainnet and we will cover these at the end.
Setting up a layer 1 node on Tezos
All communications of the smart rollup occur on the Tezos layer 1 network. We will need a layer 1 node on the relevant Tezos network for the smart rollup node to work. We will use a full:50 node because we need more information than a full node to support the smart rollup operations.
We wrote an article on setting up a node but let’s recap:
1. Make sure you have gpg, curl and lz4 installed. Then install the GPG key used to verify the authenticity of the packages:
sudo apt install -y gpg curl lz4
curl -s "https://apt.tzinit.org/keys/tzinit.asc" | \
    sudo gpg --dearmor -o /etc/apt/keyrings/tzinit.gpg
The key’s fingerprint is 181E 6294 A077 0AE9 AF01 73B2 1F68 8E12 01D8 19B4.
2. Set up the APT repository.
echo "deb [signed-by=/etc/apt/keyrings/tzinit.gpg] https://apt.tzinit.org/debian trixie main" \
    | sudo tee /etc/apt/sources.list.d/tzinit-octez.list
3. Then install the Octez client and node software:
sudo apt update
sudo apt install -y octez-client octez-node
4. Configure the node as a full node on shadownet. You will need to adjust the RPC settings if you will run the smart rollup software on a different machine. The packages use the tezos user.
sudo su - tezos
octez-node config init \
	--network=https://teztnets.com/shadownet \
	--history-mode=full:50 \
	--net-addr="[::]:9732" \
	--rpc-addr="127.0.0.1:8732" \
			--data-dir /var/tezos/.tezos-node
5. Still as the tezos user, download a full:50 archive and decompress it:
cd /var/tezos/.tezos-node
wget -O - https://snapshots.tzinit.org/shadownet/full50.tar.lz4 | \
	lz4cat | tar xf -
exit
6. Run the node and synchronise with the network:
sudo systemctl enable octez-node
sudo systemctl start octez-node
Once the node has generated its identity, you can check the synchronisation process:
octez-client bootstrapped
Or you can check the logs in /var/log/tezos/octez-node.log.
Installing the smart rollup software
The smart rollup node is released independently from the main Octez node software, but the Tzinit packages provide the correct version. To install it, run:
sudo apt install octez-smart-rollup-node
Joining the rollup as an observer
We need to configure smart rollup node. Then we need to seed it with a recent snapshot of data. It is possible to synchronise the node from the beginning of the rollup. This might need an archive layer 1 node. We will use a snapshot for simplicity.
We also need to make sure the node has the complete set of WASM preimages. On the main chain, the rollup has a computer program (called the kernel) but it is too small to contain the full Etherlink logic. Fortunately we can do this from a pre-images endpoint.
1. Configure the smart rollup daemon to run as an observer as follows:
sudo su - tezos
octez-smart-rollup-node init observer \
  config for sr19fMYrr5C4qqvQqQrDSjtP31GcrWjodzvg \
  with operators --history-mode full \
	--data-dir /var/tezos/.tezos-smart-rollup-node \
	--pre-images-endpoint "https://snapshots.tzinit.org/etherlink-shadownet/wasm_2_0_0"
exit
The history mode option tells the node to work in full mode which is enough to reconstruct state. An alternative setting is “archive”, which stores everything. The last option allows the smart rollup node to update its preimage directory automatically.
2. Import an Etherlink snapshot for the rollup. Tezos Foundation provide these:
sudo su - tezos
wget https://snapshots.tzinit.org/etherlink-shadownet/eth-shadownet.full
octez-smart-rollup-node snapshot import eth-shadownet.full \
	--data-dir /var/tezos/.tezos-smart-rollup-node
rm eth-shadownet.full
exit
3. Set up the smart rollup node to run:
sudo systemctl enable octez-smartrollup
sudo systemctl start octez-smartrollup
You can view progress in /var/log/tezos/octez-smart-rollup-node.log. You will see entries like this:
Mar 01 20:04:48.820: Finished processing layer 1 head
Mar 01 20:04:48.820:   BKp4cCn63pkT3LSapEejAJ4GWw9BzbdroYvVJTvKgGJYcJSXxda at level 5583497 in
Mar 01 20:04:48.820:   172ms
Mar 01 20:04:48.820: Processing head BM6u6soDh6rosTWJkUFydLRJV9aMQ3rgNbT9dHdRP6EHuYWe4KS at level
Mar 01 20:04:48.820:   5583498
Mar 01 20:04:48.821: Fetching 254 messages from block
Mar 01 20:04:48.821:   BM6u6soDh6rosTWJkUFydLRJV9aMQ3rgNbT9dHdRP6EHuYWe4KS at level 5583498
Congratulations - you are receiving data from the Etherlink rollup.
Joining the rollup as an operator
The process to join the rollup as an operator is very similar. But to be an operator, you must stake a 10000tz bond. Also you will need some tz to perform operations. As we are demonstrating this on shadownet, we will generate the keys on the server and fund them from the test faucet.
We will create a key for the operator bond and a key for batching operations. In practice, you will only need the batching key if you are receiving operations from an EVM compatibility node. But we include it here for completeness.
1. If you have previously set up a smart rollup node, stop it and remove the configuration file. If you are changing networks, remove the existing data directory.
sudo systemctl stop octez-smart-rollup-node
sudo rm -rf /var/tezos/.tezos-smart-rollup-node/config.json
2. Generate the keys and get the public key hashes:
sudo su - tezos
octez-client gen keys operator_key
octez-client gen keys batcher_key
octez-client list known addresses
exit
3. Go to the faucet and obtain 12000tz for the operator_key key. This is enough for the bond 10000tz and some spare for fees. Then obtain 1000tz for the batcher_key key. Use the public key hashes from the previous step.
4. Configure the smart rollup node:
sudo su - tezos
octez-smart-rollup-node init operator \
    config for sr19fMYrr5C4qqvQqQrDSjtP31GcrWjodzvg \
    with operators \
		operating:operator_key \
		cementing:operator_key \
		batching:batcher_key \
		executing_outbox:operator_key \
	--history-mode full \
	--data-dir /var/tezos/.tezos-smart-rollup-node \
	--rpc-addr 0.0.0.0 \
	--pre-images-endpoint "https://snapshots.tzinit.org/etherlink-shadownet/wasm_2_0_0"
exit
Note that we have set up the node to listen for Remote Procedure Calls (RPC) on the Internet. You should consider protecting the port (8932) with a firewall. Rollup applications use the RPC port. An example of this for Etherlink is the EVM node octez-evm-node which we will not cover here.
5. If you haven’t set up an observer before, you’ll need to import a snapshot. Follow the observer procedure from point 2. Import the snapshot and get the WASM file. Then enable and run the smart rollup node.
Congratulations - you have a working operator node.
Doing this on mainnet
The process for joining the Etherlink rollup on mainnet will be similar. When setting up the Tezos L1 node, configure it with --network=mainnet. Then use the resources in the table below. The Etherlink mainnet resources will be available shortly after launch.
| Item | Value |
|---|---|
| mainnet L1 full:50 | https://snapshots.tzinit.org/mainnet/full50.tar.lz4 |
| smart rollup address | sr1Ghq66tYK9y3r8CC1Tf8i8m5nxh8nTvZEf |
| Pre-image endpoint | https://snapshots.tzinit.org/etherlink-mainnet/wasm_2_0_0 |
| Etherlink snapshot | https://snapshots.tzinit.org/etherlink-mainnet/eth-mainnet.archive |
Of course, on mainnet, the tz on the operator and batcher keys have a real value. You should consider keeping the keys behind a remote signer when running an operator. Also be careful when configuring the smart rollup node as you will be locking a 10000tz bond. You do so at your own risk.